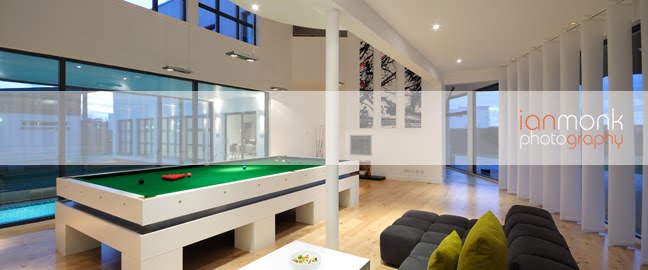
I thought I would post up a few photos from a showhome I shot last week. The reason I'd like to post them is to show how I used a couple of flashes to even out the light in this livingroom. I always carry three flashes with me on every job but I don't always need them. If I'm shooting interiors I ideally like a nice cloudy day which will give me a softer light. If it's a sunny blue sky day it would give me shafts of light that are much much lighter than the rest of the interiors, basically far too much dynamic range for the camera.
I know a lot of people like to use HDR these days by bracketing between 3 and 9 shots and combining them in the computer, but that's not for me. I rarely see an HDR photo that I like and I'd MUCH rather know that I've got the shot before I leave the site rather than later on after half an hour on the computer looking at a picture that just doesn't look quite right!
There's a few things you can do to deal with these shafts of light such as pulling blinds down or even using a white sheet to cover the windows to soften the light a bit more, but if you have the windows in the shot then this isn't really going to work so well. Also, if the view is important for the shot then you really only have two options, light the room up to the same exposure value as the exterior ambient, or go the HDR route (you could take one exposure for the view and one for interior and mask in photoshop but to be honest, quite often just two frames like this don't sit well together.)
So anyway, on the shot above you can probably see a marked difference in the exposure of the upper and lower halves of the room. This was due to the angle of the sun coming in the window behind me. Also note that the lights are on. Some clients prefer to have internal lights on and some prefer them to be off. It's a matter of preference and it can even depend on the type of room you're shooting. If there are small spotlights then I'd usually prefer them to be on, especially if there's any reflective surfaces showing. I usually shoot between f11 and f16 which gives you a nice 'star/twinkle' effect from point light sources that add a little bit of extra interest in the frame. But for lights such as these I quite like them to be off so they don't burn in too much during the exposure. This also means the white balance is a lot more straight forward of course.
So I turned the lights off and took another shot to see how the shadows on the wall were affected...

I could see straight away that I would need to set up a couple of flashes to get a more even coverage. One option would of course to fix it in post production, but, as with the HDR, I'd much rather get the shot in the camera before I leave the site. Also, if I'm honest, it's also a bit of professional pride for me to get pictures as close to finished in camera as possible. I do of course post process all images but if you can do it in camera then I think you should.
Anyway, to even out the exposure I put two flashes fairly high up in the corners of the room behind me, both pointing into the corners with wide angle diffusers on. Pointing them into the corners gives a much more even coverage because it's making the light bounce off in all directions. This is really important to reduce shadows. One place I always look at when I'm looking at interior shots are the ceiling lights. You can usually tell where the dominant light is coming from by the shadow.
In the next shot you can see the coverage isn't quite even enough and so is giving me a bit too much of a harsh shadow on the ceiling light...

You can see two shadows from the flashes but you can also see that the shadow on the far wall has pretty much disappeared. This told me that the power of the lights was fine but that they needed to be backed off from the ceiling a bit. More distance means more coverage as they hit a wider area of the wall. This would fill in those shadows nicely. So I backed both off a bit (basically lowered the stands by about a foot) and shot again to get the final shot...

This might seem like a lot of effort to go to for a shot of a livingroom but it's details like this that make a difference. For the final delivered shot I also cloned the chair which has some of it's leather covering falling off (which I missed on the day!!) and tweaked the white balance a touch.
There is a nice even light in the room that I think makes it look clean, fresh and inviting and there's no harsh shadows to distract or draw the eye to. There's definitely a time and place for higher contrast looks but for most interior shots a nice bright, clean and fresh look is what is asked for.
Apologies for the longer post as it's probably a bit rambling but I get carried away easily :) Please leave a comment with any thoughts or hints for me or others, it's much appreciated.
Cheers
Ian :)


No comments:
Post a Comment